Time needed
1 h 5 min
What you need
- 1/2-inch exterior-grade plywood project panel (2x4 feet)
- 16-gauge clear vinyl sheeting (1/2 yard)
- 1x2-inch pine furring strip
- 3/8-inch adhesive foam weatherstripping roll
- 1-inch wood screws
- Adhesive magnetic tape or two small disc magnets
- Wood glue, super glue, or epoxy
- Exterior acrylic latex paint or spar urethane
- 120-grit sandpaper
- Sturdy wooden dowel or broomstick for window security
- Drill with a 3/8-inch drill bit
- Jigsaw or circular saw
- Bar clamps
Tools
- Tape measure
- Carpenter's square and pencil
- Jigsaw with wood-cutting blade
- Power drill with 3/8-inch drill bit
- Screwdriver
- Utility knife or heavy-duty scissors
- Paintbrush
- Safety glasses
You can build a sturdy, weather-sealed DIY window cat door for under thirty dollars using basic plywood, clear vinyl, and foam weatherstripping from your local hardware store. Commercial glass-cut pet doors and custom aluminum sash inserts routinely cost two hundred dollars or more, putting safe window access out of reach on a tight budget.
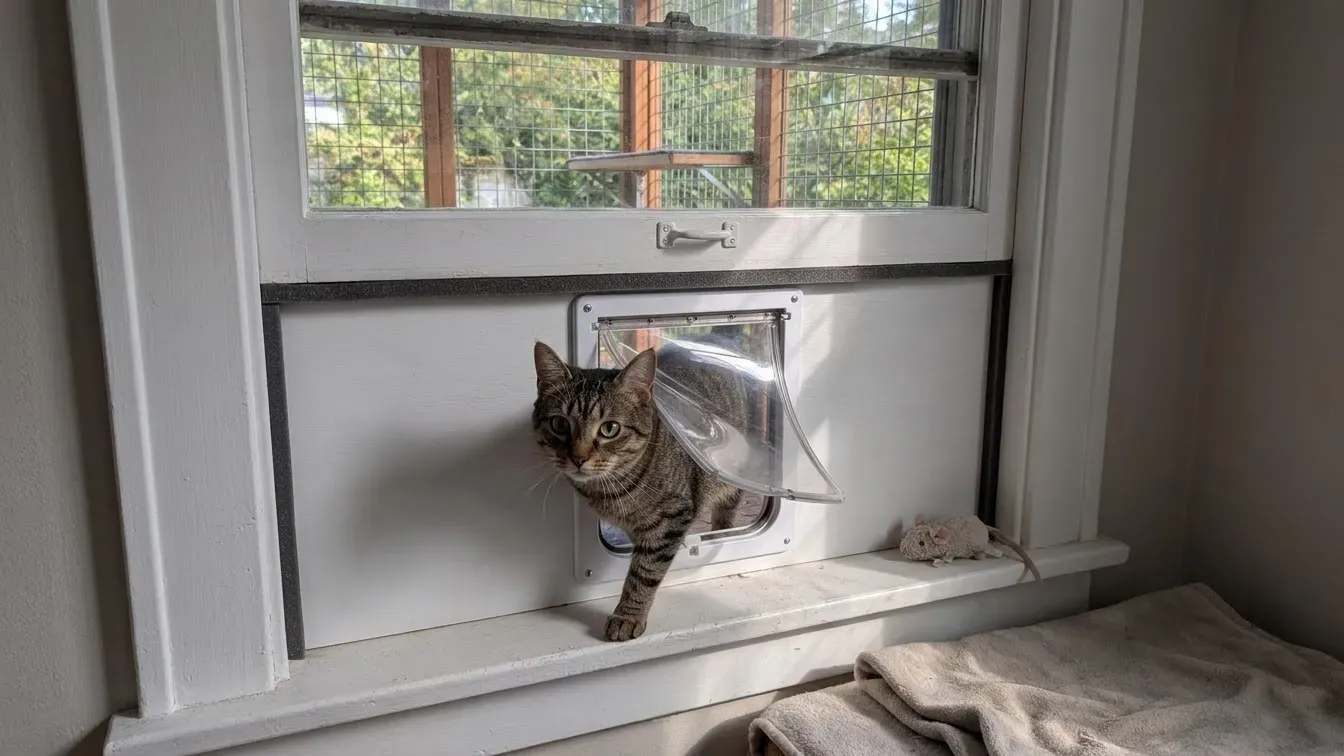
By constructing a removable wood panel that sits snugly inside your existing window track, you give your cat safe entry to an enclosed catio or screened porch without altering the glass. This budget-friendly build takes about an hour, seals out cold drafts, and locks securely so your home stays safe year-round.
- 1
Measure Your Window Track and Cat
Raise your lower window sash to your desired insert height, usually 10 to 12 inches high. Measure the exact interior width of the window channel from left to right at the bottom, middle, and top of the opening, then subtract 1/8 inch from the narrowest measurement so the panel slides in cleanly. Next, measure your cat's chest width and shoulder height to size the opening. Most adult cats fit comfortably through an opening 6.5 inches wide by 7.5 inches tall, though larger breeds need extra clearance. You can double-check ideal proportions in our cat door dimensions guide before marking your wood.
- 2
Cut the Plywood Insert Panel
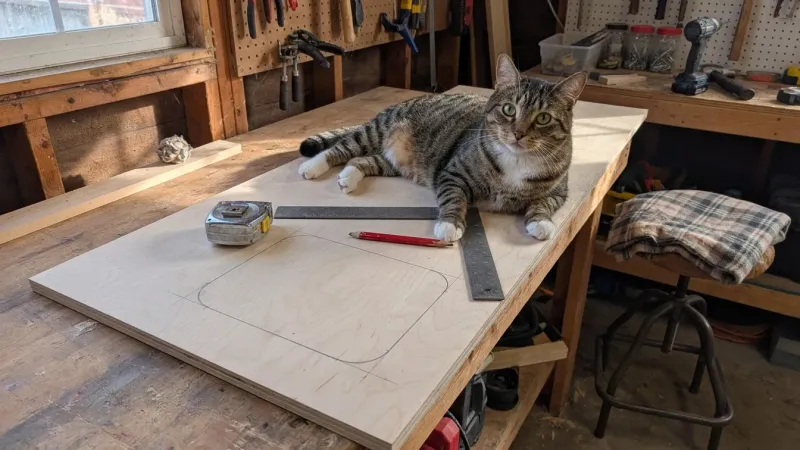
Transfer your window width and height measurements onto a 1/2-inch exterior-grade plywood project panel using a carpenter's square and pencil. Clamp the panel securely to a workbench or sawhorse and cut along the outer lines using a circular saw or jigsaw. Dry-fit the plain rectangle inside the window track and lower the sash onto the top edge to confirm a snug fit without binding. If the corners catch on aluminum or vinyl track lips, notch the bottom corners slightly with your jigsaw until the panel rests flat on the sill.
- 3
Mark and Cut the Cat Opening
Lay the plywood panel flat and mark the cat cutout centered horizontally, positioning the bottom edge at least 2 inches above the window sill so the panel stays structurally rigid. Use a speed square to draw a crisp 6.5-by-7.5-inch rectangle, tracing a small jar lid at each corner to create rounded edges that prevent wood splintering and give your cat smoother entry. Drill a 3/8-inch starter hole inside each corner of the rectangle, insert your jigsaw blade, and carefully cut along the pencil lines.
- 4
Sand Smooth and Seal Against Moisture
Wrap 120-grit sandpaper around a small wood block and sand all outer edges and the inner cutout until completely smooth so your cat's fur and paws never catch on splinters. Wipe away all sawdust with a damp cloth and let the wood dry. Apply two thin coats of exterior acrylic latex paint or spar urethane across the front, back, and every cut edge. Sealing the raw plywood edges prevents rain, dew, and condensation from swelling the wood fibers during wet weather.
- 5
Cut and Mount the Clear Vinyl Flap
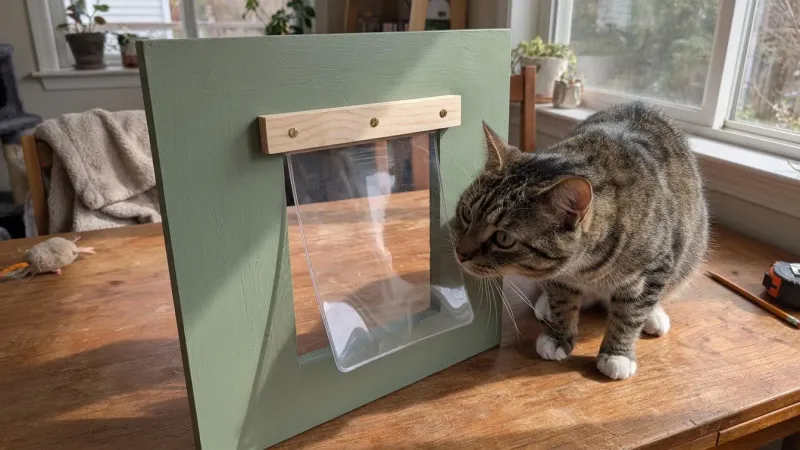
Cut a rectangle of 16-gauge clear vinyl sheeting that is 1/2 inch wider and 1.5 inches taller than your cutout opening so it overlaps the wood slightly to block drafts. Cut a 7-inch length of 1-by-2-inch pine strip to act as a clamping bar above the opening. Sandwich the top 1 inch of the vinyl flap between the pine strip and the plywood panel, then drive three 1-inch wood screws through the pine strip into the panel. Test the flap by hand to ensure it swings freely inward and outward without catching.
- 6
Add Magnetic Closure and Weatherstripping
Attach a strip of lightweight adhesive magnetic tape—or sandwich a small magnet between two pieces of heavy-duty tape so it adheres securely without peeling off flexible vinyl—to the bottom center of the vinyl flap, and mount a matching piece onto the face of the plywood panel right where the bottom edge of the overlapping flap rests. This gentle magnetic catch keeps wind from blowing the flap open while separating easily enough for kittens and senior cats to push through effortlessly. Next, press 3/8-inch adhesive foam weatherstripping along the left, right, and top perimeter edges of the plywood insert to create an airtight seal against the window frame.
- 7
Install the Insert and Secure the Sash
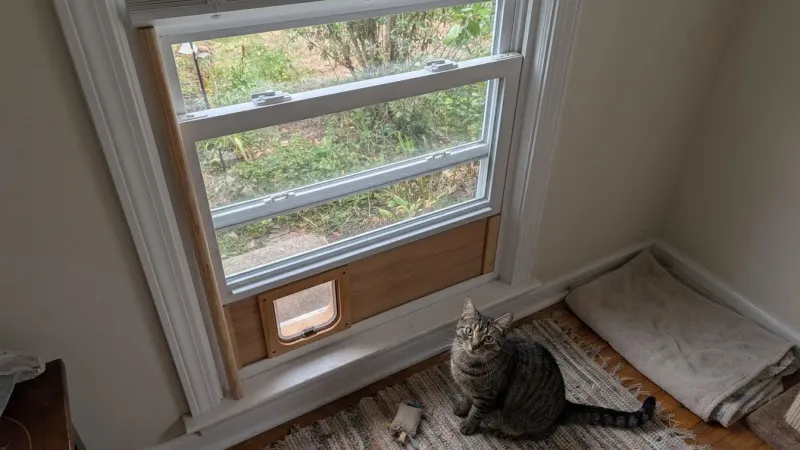
Slide the finished plywood insert into the window channel and firmly press the lower window sash down onto the top weatherstripped edge. Check around the entire perimeter for daylight or air leaks, adding extra foam tape where needed, and press adhesive foam weatherstripping or a foam sash-gap filler strip into the horizontal gap between the top of the raised lower window sash and the upper window pane to block drafts. Finally, measure the exposed upper window track between the top of the lower sash and the top frame, cut a sturdy wooden dowel to that exact length, and wedge it vertically into the track so the window cannot be lifted from the outside.
Budget Breakdown and Smart Material Swaps
Keeping this project under thirty dollars comes down to buying smart at the hardware store. Instead of purchasing a full 4-by-8-foot sheet of lumber, check the project panel aisle for a 2-by-4-foot quarter-sheet of 1/2-inch exterior-grade plywood or sanded birch, which typically costs around $12 to $15. Many hardware stores will even make one or two straight crosscuts on their panel saw for free if you bring your exact window width.
For the flap, skip replacement pet door parts and buy a half-yard of 12-gauge or 16-gauge clear vinyl sheeting from the fabric or utility aisle for roughly $3. Add a roll of adhesive foam weatherstripping ($4), a 1-by-2-inch pine furring strip ($3), and a basic wooden dowel or tension rod ($4) to lock the window sash in place. If you want extra thermal protection during freezing months, check our guide on how to seal an insulated window cat door for winter for simple foam board upgrades.
Safety and Security Checks for Pet Owners
A low-cost window insert must never compromise your cat's safety or your home's security. Always make sure a window cat door leads strictly into a fully enclosed catio, secure screened porch, or fenced outdoor run. Letting cats roam freely outdoors exposes them to traffic, predators, parasites, and infectious diseases, so never vent a window insert directly onto an unfenced yard or an upper-story ledge without secure screening.
Preventing human intrusion is equally critical because opening the lower sash disables your window's factory center latch. Always cut a sturdy wooden dowel or broomstick to fit tightly in the upper window track between the top of the lower sash and the upper window frame. For ground-floor windows, pair this blocking rod with a screw-on window track lock so the sash cannot be pried open from outside.
Common DIY Window Insert Mistakes to Avoid
Rushing the measurements is the fastest way to waste lumber on a tight budget. Window frames settle over time, meaning the top of your opening might be slightly narrower than the sill. Always measure the width in three places and cut your plywood to the narrowest measurement minus 1/8 inch to allow room for thick foam weatherstripping.
Leaving raw plywood edges exposed to rain and humidity will cause the wood to swell, warp, and jam inside the window channel. Even if the insert sits under an overhang, apply two coats of exterior latex paint or polyurethane sealer to all six sides—especially the cut inner edges of the cat opening—before installing the flap.
Building your own window cat door keeps over a hundred dollars in your pocket while giving your cat safe, independent access to their enclosed outdoor space. With sealed plywood, a flexible clear vinyl flap, and a solid wooden security dowel in the upper track, your budget insert will block drafts and keep your home secure through every season.
Sources: International Cat Care · ASPCA
Frequently asked questions
Can I build a DIY window cat door without power tools?
Yes. Many hardware stores will cut your plywood panel to width for free, and you can cut the inner cat opening using an inexpensive manual drywall jab saw after drilling corner holes with a basic hand drill. Heavy-duty kitchen shears easily trim the clear vinyl flap.
How do I lock my window when a DIY cat door insert is installed?
Because raising the bottom sash disengages the built-in window lock, cut a thick wooden dowel or broomstick to fit snugly inside the upper window track between the top of the lower sash and the upper frame. Add a clamp-on track lock for extra security.
Is a DIY window cat door safe for renters?
A removable plywood insert is ideal for renters because it requires zero screws, glue, or permanent cuts to the window glass or frame. When you move out, simply remove the security dowel, lift out the plywood panel, and close the window normally.
How do I train my cat to use a clear vinyl flap?
Tape the clear vinyl flap open for the first two days and place treats or a favorite toy on the other side so your cat walks through freely. Once they cross confidently, lower the flap and guide them through with a treat until they learn to push it.

Nathan Brooks
Nathan Brooks runs Farmingzoom to help loving pet owners create safe, enriching homes for their animals. He cares deeply about responsible pet care and focuses on making everyday decisions simpler for fellow owners.…